Abstract
I have wanted a cyberdeck of some kind for a long time. A portable and very open to modification linux computer with included peripherals in a hacker format. I thought a good venue for this type of project would be a broken example of one of the early portable computers of the 80s and 90s. So I looked back on what stranger form factors existed in the time and planned on using this chassis along with speakers and an HD monitor to retrofit with a Raspberry Pi 5.
Design
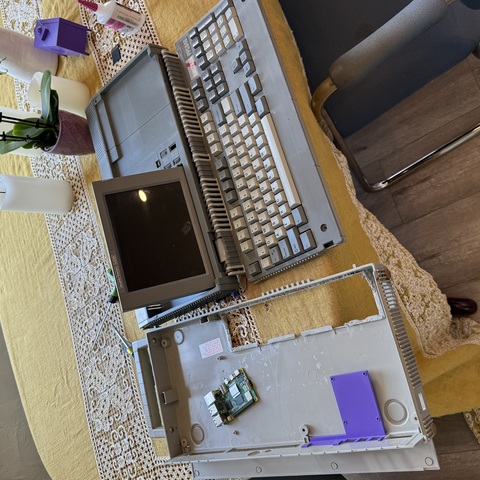
I happened to luckily find one of my favorite models from this era, the Amstrad PPC 640. This computer was rare in the United States but its dual unfolding screen and keyboard gives it a Blade Runner quality that would be perfect for the retro and complex look I was hoping to achieve. After gutting what remained of the original computer, I sourced an HD dash cam screen from amazon, cutting apart the case to harvest the LCD and driver board. I made a rectangular bezel from the original case, the monitor fit inside and this was sorted. Next was the keyboard, I initially planned to reuse the keycaps on a different board that output to usb directly, however this would be almost impossible given the strange layout of the Amstrad board and the container was so incredibly thin because the original membrane keyboard was all flexible circuit board within. So I decided to use the matrix as it already exists and decode the signals in the main case with a microcontroller. For the main board, I decided to create a cradle and IO panel as one unit that would mount to the existing IO holes in the back of the main case. Thus I created a direct fit for this port, then using elevations of the Raspberry Pi to create a support structure for the board that could be glued to the inside of the plastic case within.
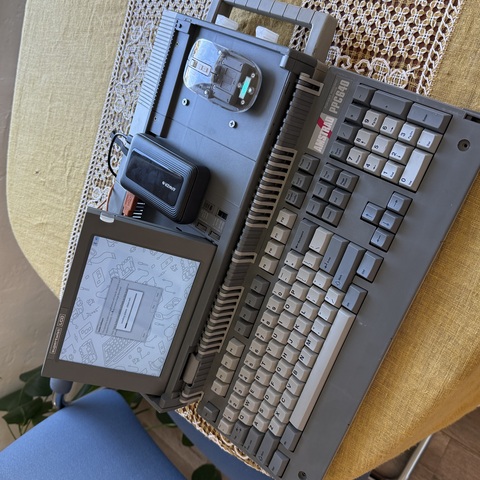
Last parts to design were some kind of mouse, and replacement tabs that had snapped off the unit before I got it. For the mouse, I found an interesting basic mouse that fit the design aesthetic of the build perfectly, so I decided to leave this part uncomplicated. Instead I turned my attention to some kind of mount, using the bays of the case originally used for floppy drives, I designed a clip-in mouse holder around the mouse profile that would allow a user to securely store the mouse in that open space when not in use. To power the monitor and Raspberry Pi, a portable power bank with pass through charging for ideal usability was selected, when in use it rests on the empty space to the right of the monitor, allowing it to easily connect to both the powered units. Further cosmetic changes I opted out of, since the battered old Amstrad already has a unique sci-fi look to any of us who were born after its obsolescence or haven’t seen one before. It feels like a lived-with part of a different world, while being a perfectly functional Raspberry Pi.
Fabrication
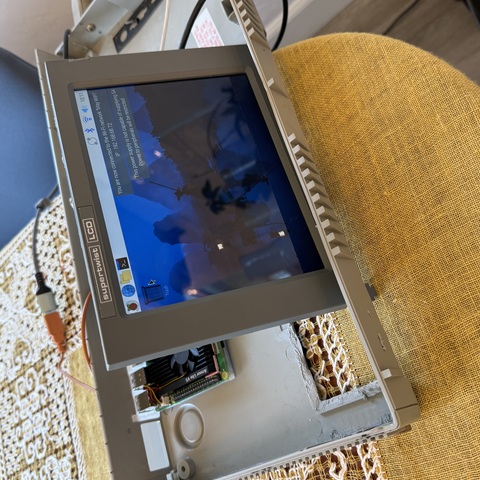
I selected a monitor with a thin enough profile to directly replace the bulky mono LCD that was in the computer before. Importantly, I picked one with just the same aspect ratio so I wouldn’t have to modify the characterful bezel of the original case. On the back I drilled and fastened my custom IO bezel with 1.5mm screws for an overbuilt look. The monitor panel itself was glued in with hot glue and has positive pressure via foam supports on the back to the removable back panel. The back panel retains the original Torx self tapper screws for mounting, and the unit operates as normal. All other parts were 3D printed out of polycarbonate which is strong enough to live among the ABS components the case is made from. The Pi support had to be dimensionally accurate for the case, the Raspberry Pi’s ports, and the bottom clearances for SMD components. This took a couple of iterations to get just right, and the final version is glued to the case via a small wedge to account for the odd slope of the case’s inside. The mouse holder again took a few tries to get the curves close enough to meet my expectations for an easy pull of the mouse while securely retaining it. I printed lower profile tests to see if it would neatly fit around the real parts, and when I was happy, printed it with moderate infill to give it some springy stiffness.
The final challenge was the keyboard. I had to decode the original key matrix from the amstrad and output this as usable ascii to my computer. From the thin ends of the flexible PCB sticking through to the main case this challenge depressed me for a while, until I saw the similarity between a header-less Raspberry Pi pico and the flex edge mounts on the original computer motherboard. I was fortunately able to directly solder the headers to the pico, meaning the connection was basically direct, a few analog pins had to be rerouted but that’s easy! So my next step was to get a basic program on the pi with circuit python and decided to just go about the whole thing via guess and check, which wasn’t that awful, I moved characters around my character matrix until everything aligned, consulted existing code for what to do about shift and function keys and now the keyboard is done. I packaged everything free floating inside the case until I find the area where it likes to naturally rest, then I’ll use some zip tie anchors to keep the pico from rattling around too much.
Conclusions
This is the first of my computer projects that is truly portable and something I have used organically. The battery life from the power bank is on par with my MacBook, the functionality is great, and the interface hiccups are now mostly non-existent. On a second approach I would have liked to make the backup power bank more integral to the design, by connecting in the same method that the mouse is stored, but it’s nice having a battery bank on top of the computer to charge a phone while you work too! I long avoided completing this project because my Raspberry Pi 3 Kaypro II was way too slow to be usable, and no other SBCs caught my attention. I tried version one of this with a disassembled windows gaming laptop, which luckily didn’t work out because it wasn’t a very compelling design process. The Pi 5 is absolutely fast enough to do some of my more common tasks. Given that I teach and primarily use Onshape, I even designed some of the more recent parts for this project in CAD on the very computer the parts were for, which was a super cool experience. Next maybe some fluorescent blue lights or something…